Blacksmithing - Beginner’s Guide
Some players complain that it’s difficult to understand crafting mechanics in ESO. This guide will help you to understand everything you need to know pretty fast. I personally like Blacksmithing and I wrote this step by step guide to share my crafting experience with you.
Blacksmithing in ESO is a great profession that allows you to create different types of weapon using steel. You can create one handed and two handed swords, axes, daggers and heavy armor. On my opinion this profession is great for melee warriors.
Skills
Let’s begin from the skills. Any serious Blacksmith should spend several skill points into the Blacksmithing skill line. This will help you to progress much faster in this difficult profession. You will be able to receive more resources and make researches faster. The table below displays all skills a Blacksmith can master.
| Metalworking (1/9) | Allows the use [Ingot type: Iron, Steel, Orichalc, Dwarven, Ebony, Calcinium, Galatite, Quicksilver, Voidstone] for craftimg items. Must have! | |
| Keen Eye: Ore (0/3) | Ore nodes in the world will be easier to see within 20/30/40 meters. Useful ability for farming nodes. | |
| Miner Hireling (0/3) | A miner hireling will send you ore and possibly other items every day. When you level this skill hireling will bring you more resources with better quality. Must have! | |
| Metal Extraction (0/3) | Improves the chance of extracting Blacksmithing ingredients. Also great skill that allows to get more resources from deconstructing and extracting. | |
| Metallurgy (0/3) | Reduces research time by 5%/10%/20% and allows the research of two/two/three traits at once. Great skill for fast researching. | |
| Temper Expertise (0/3) | Increases the chance of improving items with tempers. Must have! |
Where to take ingredients and materials?
You will have to collect different types of ore in order to be a blacksmith. You can find everything you need for crafting during your exploration and questing. Once you leave the city be attentive and look around, collect all ore you see. You need to look for special ore mines. The screenshot below shows how a mine looks.
As you see it is not very difficult to identify gathering node. There is one trick that will help you: ore mines are always situated near rocks. Don’t even try to find ore on a plain or in the field. You need to look for ore mines near mountains or hills.
Tip: be quick. When you see a gathering node you need to collect the resource as fast as you can. Other players are also looking for resources and if someone will start mining the ore faster than you - you have no chances to benefit from this current node.
Some players complain that it is difficult to see gathering nodes in the world. But it can be fixed. There is a special skill “Keen Eye: Ore” that can help you to see ore mines better. The effect of this passive allows you to see ore easier within 20/40/60 meters range (depending on skill rank). So if you are going to be serious blacksmith you have to learn this passive in order to gather resources quick.
There is also special perk called “Miner Hireling”. After mastering this perk a Miner Hireling will send you different resources and probably items every day.
There is another way of getting materials and level up Blacksmithing: to extract items from the weapons and armor you find during exploration. Don’t sell daggers, swords, axes; better extract materials from them. This will help you to level up profession faster and will give you extra resources for crafting.
Where to craft?
You need to find Blacksmithing station in order to craft. It can always be found in big cities. Use map of the city and it will show you where to go. Usually crafting stations are located not far from each other. So if you found Enchanter’s table look for Blacksmithing station not far from it.
When you use the anvil for the first time you will see a brief in-game guide that will explain you several aspects of Blacksmithing. I recommend to read this guide anyway.
Turning Iron Ore into Iron Ingots
First of all you need to transform the ore you have collected into ingots. You can use only ingots for creating items. And this is a first difficulty for many players. They see crafting interface but don’t know how to create Iron Ingots using Iron Ore. But it is really simple: go to “Extraction” tab and use it to extract ingots from ore.
This tab also allows to destroy steel weapon and armor getting extra resources for crafting and receiving Blacksmithing experience points.
You will require 10 pieces of ore in order to get 10 ingots. But very often you will get 8-9 ingots and a trait stone.
| Item | Material | Level | ||
|---|---|---|---|---|
| Iron ingot | Iron ore | 1 – 14 | ||
| Steel ingot | High Iron ore | 16 – 24 | ||
| Orichalcum ingot | Orichalcum ore | 26 – 34 | ||
| Dwarven ingot | Dwarven ore | 36 – 44 | ||
| Ebony ingot | Ebony ore | 46 – 50 | ||
| Calcinium ingot | Calcinium ore | Veteran 1 – 3 | ||
| Galatite ingot | Galatite ore | Veteran 4 – 6 | ||
| Quicksilver ingot | Quicksilver ore | Veteran 7 – 8 | ||
| Voidstone ingot | Voidstone ore | Veteran 9 – 10 |
Sometimes when you smelt ore or destroy weapons in order to get ingots you will receive special stones that can be used to improve the weapon. I will tell you about improving items later in this guide.
Now we have ingots and can start crafting.
Creating an item
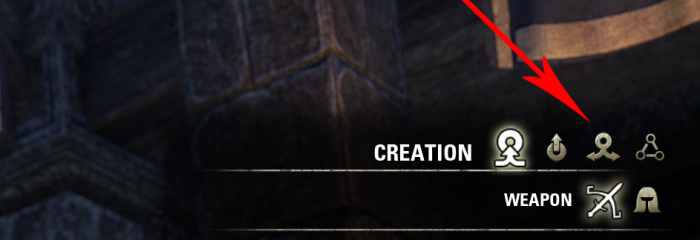
In order to see crafting menu you need to choose the first tab in your crafting interface. And this is where the magic begins. Crafting interface may seem unusual but it is really comfortable to use. The screenshot below shows the Creation tab and the detailed explanation of each part is behind the image:
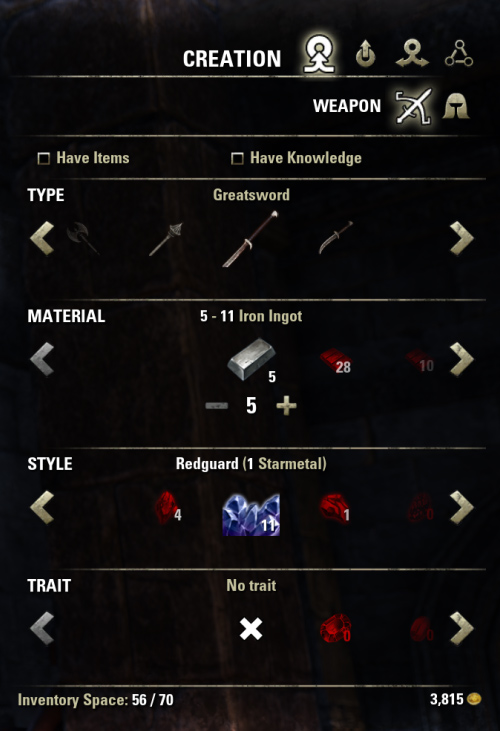
First of all you need to select what to craft. As you see there are 2 options: weapon and armor. Don’t forget about it. Most of the crafting tabs have such options.
Now after you have selected Weapon you can change the type of it. Choose what type of the weapon you want to create: one handed sword, two handed sword, axe, dagger and so on.
“Material” section allows to change type of material you want to use and its quantity. The first available material is Iron Ingot. It is a low level ingot we have created on previous step. Changing materials allow you to change “strength” of an item. You will be able to use other materials when you level up Blacksmithing. The quantity of ingots also affects the strength of item. The more Ingots you add the better the item will be.
Crafting Style section allows to change appearance of an item. It’s not a secret that there are 10 races in ESO and each has its own unique style of armor and weapon. The same dagger in Imperial style will look different from dagger in Dunmer style.
Note: each race can craft only its racial items in the beginning. You need to discover other crafting styles in order to use them. They can be discovered in special books you can find in Tamriel.
To create an item in a specific style you will need a specific stone. You can purchase it from a blacksmith trader that usually stands near the Blacksmithing station. It’s not difficult to find him.
Trait section allows you to insert special trait that will give extra bonuses to the final item.
Now when everything is selected you can press ”R” button and the item will be created.
Improving an item
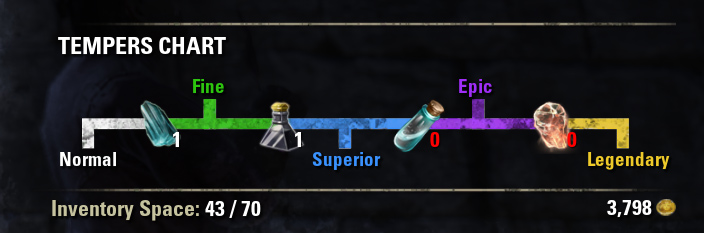
Blacksmith can not only create items, but also improve them. All armor and weapon in the game has different quality. You can identify the quality of a particular item by a color of its title.
- White - Normal
- Green – Fine
- Blue – Superior
- Violet – Epic
- Yellow – Legendary
When you create an item it has normal “White” quality. But you can make it better by improving to the next quality rank.
Note: you can improve not only crafted items, but also other items found in the game. It is one of the best bonuses of crafting.
Don’t forget that a Blacksmith can improve only specific armor and weapon types: swords, daggers heavy armor and so on. He can’t improve staffs, bows, light and medium armor.
You will require special rare reagents to upgrade an item. You can find these reagents while traveling and exploring world and also when smelting ore and extracting ingots from items. That’s the reason why I don’t recommend you to sell weapon and armor you can use for extracting.
Now if you have required reagents you can improve an item. The most interesting part here is that improvement is not 100% guaranteed. It is possible to change probability of successful improvement by changing quantity of particular rare reagents you want to use. 1 piece of reagent adds 20% to the chance of improving item successfully. That means if you spend only one piece you will have 20% chance. 2 pieces – 40% and so on.
If the improvement is not successful the item will be destroyed. If the item you want to improve is really valuable you’d better collect and spend 4-5 pieces in order to maximize chances.
Research
The last tab of crafting menu is called “Research” and allows you to research traits of a particular item. What for? You can use this knowledge later, when you craft new items. You can add different traits to your items making items much stronger and beneficial.
If you want to research new trait you must have an item with this trait in your inventory. For example extra critical strike chance. You can make a research and learn the effect in order to be able to apply this new effect to your own items while crafting.
The first research takes 6 hours of real time to be finished. The research time doubles for each trait you are learning on a particular item type.
You may think that research time is not very important, but you are wrong. Research time doubles every time you learn new trait on a particular item type. The order of traits doesn’t matter: you may learn the last trait and then the first one. Just remember that every successful research doubles the research time for the next attempt. Let’s make some calculations:
| Hours | = Days | |
| Trait 1 | 6 Hours | |
| Trait 2 | 12 Hours | |
| Trait 3 | 24 Hours | = 1 Day |
| Trait 4 | 48 Hours | = 2 Days |
| Trait 5 | 96 Hours | = 4 Days |
| Trait 6 | 192 Hours | = 8 Days |
| Trait 7 | 384 Hours | = 16 Days |
| Trait 8 | 768 Hours | = 32 Days |
| Total Time | 1530 Hours | = 63.75 Days |
As you see, it will take 64 days to research all the traits of a particular item type. For example if you want to research all traits for daggers you will have to spend 64 days for it. But don’t forget that there are a lot of different item types within Blacksmithing profession…
Each weapon type requires individual researching. I mean if you have researched how to add critical strike chance to your dagger you will not be able to use this effect for a sword. You need to perform an individual research for each weapon type. Each weapon type will require 64 days for learning all the traits.
How to research faster? There is one thing that will help you to finish all the researches much faster. There is a great skill called Metallurgy – if you spend 3 skill points and boost it to maximum rank you will be able to research 3 traits at once and the research time will decrease by 20%! If you are going to become serious Blacksmith you must master this skill!
Don’t forget that after you have finished all your researches you can always redistribute skill points :) The respec feture is available and you can read about how to respect here: How to reset skills and attributes in ESO?
As you see Blacksmithing is a very interesting profession that allows you to create and improve your armor and weapon. Hope this guide will help you to understand this profession fast.
Comments ()
You need to login to add comments.


In addition, the research time doubles for each trait you are learning on a particular item type.
For example, one handed sword's first trait will take 6 hours, the next 12, the next 24 and so forth.
For example On one such conversion from ore to ingots I only received 8 iron ingots but also a diamond.
BYE blue sword you wanted to use.
As Joshua mentions the time for each research of a piece doubles. In plate hand items for example there are 8 different traits. That means to research them all would take 63 days back to back. As there are 7 total slots to research — hands, chest, feet, legs, head, waist and shoulders… it could possibly take 1.2 years (7*63days) to research them one after another. That doesnt include the weapons in blacksmithing… only armour. LOL.
Thankfully there are some traits that are better with armour than others so you can be selective and reduce that 63 per slot type to 8 days for useful traits. Then add in a skill (metallurgy) you can get in blacksmithing that reduces the research time by 5% and adds a second item that can be researched at the same time this makes research much more managable when you begin to specialise in it.
Each skill start with you to be able research an item in it. Blacksmithing can research one- woodworking can research one in parallel. This also means you can have 2 items going at the same time when for each skill — too. :) At blacksmithing skill level 18 you can put another point into metallurgy and improve the time and number of items further. Enjoy skilling.